Montag, 25. März 2019

Woodmen Buildings

When looking at the pictures in the GW army books, there's a lot of stone. Only the Rohirrim seem to build with wood, but that's due to the reliance on the movies. The books suggest a lot less stone, mostly ruins from earlier ages of the world. Gondor means "land of stones", which suggests that using stone to build is not that common.

For my first human buildings, I therefore took inspiration from Dark Ages buildings, adding some elements from later periods of the Early Medieval times. They would be built from wood, the roof covered with reeds.

We'll start out with cutting front, back and sides from foam. Additionally, we'll cut very thin riders for the roof. With a ballpen, we carve planks and woodgrain into the foam. On the riders, I drew carvings.


The next step is to paint everything up. Paint it brown, add a darker wash, than brush it up with lighter colours, up to a light grey to make it look like weathered wood.
The door is sculpted out of FIMO, which is actually easier than building it from foam or coffee stirrers.
Now, the whole thing is assembled and glued with PVA, adding a roof from cardboard, as we need a base for the reed.
There are several methods to du reed or straw roofs, the most popular seemingly being using teddy-fur. Now, I couldn't get my hands on that, so I chose foam again.
We cut thin pieces of foam, using a wire brush to do the texture of reeds.
These pieces are painted and glued onto the roofs. Some static grass adds a realistic touch to them.
After all, these houses are really easy to build and look really nice on the table. With palisades and a watchtower, those make a nice basis for a woodmen village...


Dienstag, 12. März 2019

Palisades

As my vision of Middle Earth is a lot more Dark Ages than that of Peter Jackson (I'm looking at the illustrations in The One Ring...), there's too much stone in the movies. Encampments and fortifications should look like an early medieval Motte than those castles that have fallen into ruin.

So, there have to be wooden palisades instead - and I've started to build one, beginning with the entrance.

The materials: Wooden craft sticks, some wooden chopsticks, twine, cardboard and coffee stirrers.


First, we begin with building sections of palisades by binding eight craft sticks together with twine.  Two sections will then be attached to higher beams, made from chopsticks.


Don't throw away the end pieces of the chopsticks yet - we'll make the frame for the gate from them.


Next, we'll do the base. As the wooden stakes would be dug into the ground, we'll use some structure paste to form the earthworks. Form a narrow slit and fill it with PVA glue.

Paint the palisades a dark brown, drybrushing with beige, so the twine looks like rope.


Now, we erect the palisade, putting the walls into the earthworks. Supports are cut from craft sticks and glued to the main beams.

As it will be harder to reach some parts of the base afterwards, we already paint and flock the base.

From cardboard, cut two 2,5 cm wide ledges and cut craft sticks to size that will support the parapet. Glue them to the cardboard and glue the parapets onto the walls and base.


While the glue sets, we'll build the gatehouse. This was used for storing spare arrows and tar in case of an attack, so it is rather small and placed right atop of the gates.

The basic house is made from cardboard and glued together. 


While the glue dries, we build the gates. Cut some coffee stirrers to size and glue them to two other stirrers, so you built two leaves. Paint them a dark brown and drybrush them with beige.


Now let's get back to the gatehouse. The cardboard house is covered in wood, coffee stirrers again. Cut them and glue them to the cardboard base. Paint it a dark brown, drybrushing it with beige.


The parapet is also covered with wood and painted. While glue and paint dry, we'll build two ladders for the fighters to get up on the parapets.
Take two craft sticks and a coffee stirrer. Now, cut the stirrer to the desired length of the steps and cut four steps from one piece of stirrer. Form the ladder by glueing the steps to the sticks.


After painting the ladders, they are glued to the parapet and the base.


No, glue the gates into the frame, securing them on the base.

Now, we'll use beige and light grey to weather the wood. paint the tips of the beams in a light colour to simulate the hewn parts, Drybrush light grey along the edges of the wood, where sun and rain work at the wood.


This is just the first piece of palisades, but it the central one. And it is fully usable in play, as soldiers can man the parapets and shoot from them.


And, it looks really good on the gaming table...


Montag, 4. März 2019

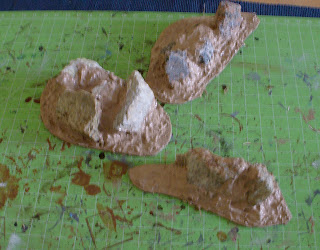
Rocky outcroppings scatter

The Plains of Rohan, home of the Horse-Lords, the Rohirrim. While I'm not really all good with the choice of location, Peter Jackson used for his movies (to my understanding, that's not really horse-land), the stony outcroppings give some unique character to the scenery.

The scenes were shot a Poolburn in NZ:
To get the character of the locale onto the gaming table, two things are needed: the grassy plains (done with a gaming mat) and those rocky outcroppings.

To me, nothing beats nature when it comes to rocks and stones. So, the first thing to do is gather some rocks. Those are washed and glued to a carboard base with PVA glue.
I then use coarse structure paint mixed with dark brown to fill the gaps and make the stones jut up from the ground. In between, I added some small gravel.
This takes a while to dry. Afterwards, I paint the 'earth' in a dark brown and the 'rocks' in a dark grey.

The rocks are now brushed wiht a lighter grey to define the texture.
The rocks are now washed with a green wash to give them a more natural look.
When the wash has dried, the rocks are brushed with light grey and drybrushed with some really light grey. The 'earth' is drybrushed with a lighter brown.

Now, static grass is applied with PVA glue, and some tufts of grass are added here and there. The outcroppings are now ready for the gaming table.
The actual stones make for a nice weight, so they won't be pushed aside so easliy in play and they help forming a landscape with the gaming mat and books to form hills.


At the Edge of the Woods

I've already written a tutorial on making a battlemat. But now, I've experimented with some different materials and methods, and the result is quite a lot better.

The base is painter's fleece, but this time, I've actually ironed it beforehand. You may skip this, if you use rolled fleece.
I've used some dark grey spray paint on a part of the fleece to get a darker base coat. After that, I mixed up some painter's acrylic, fine sand and acrylic paint (dark brown). This is applied with a broad brush.
The mixture builds a solid textured basing, making the mat thicker than the other one I did. This has additional benefits, as you'll see later on.

Next, I used various tones of brown to make for earthen colours. On some areas, I used coarse structure paint to get a different texture.
After the paint has dried up, I used watered down PVA glue to apply static grass in irregular patches. I've used different mixtures of static grasses and on one side a mixture from NOCH, called Forest Ground.
After the paint and the glue has dried, the whole mat is fixed with some matte clear spray paint. The acrylic takes some time to dry, so best leave it over night.
When everything has dried up, shake the mat well, so all the loose stuff comes off (which is conveniently removed by vacuuming). Now, cut off the border.

The additional benefit of the thicker mat lies in its ability to form a landscape. Simply put some books under the mat and hills will form. This is The Lord of the Rings for the higher hill and The Hobbit for the lower.
The mat forms really good looking hills, which support even heavy metal minis well. Now you can have something akin to an actual gaming table - with a different setup everytime you want.